Showing posts with label Condiments. Show all posts

Sunday, April 10, 2011

Hazelnut Honey


A couple months ago, M and I went on a wine tour of the Swan Valley which is about an hour drive Northeast of where we live. I had never been on a proper day long tour before of any wine region and I loved it as much as I always figured I would. We were chauffeured around wine country, passing by row after symmetrical row of grapes, learning about the local varietals and tasting an abundant amount of wine. There was such overwhelming natural beauty there. I found myself standing under a grape arbor, glass of wine in one hand, reaching up to pluck a grape with the other hand, and thinking that nothing could be better than that.

Amongst the many things I learned that day was that wine tours equal all sorts of other culinary indulgences: chocolates and nougats, locally sourced olive oils, rich tawny ports, jams, and cheeses. At one winery they had sparkling jars of canned chutneys, relishes, and jams using different wines. I noticed a jar of honey with hazelnuts suspended at the top. The ingredients just said honey, hazelnut liqueur, and hazelnuts. Easy enough. I set the jar back down and have finally gotten around to making a batch of it myself.

This required buying a bottle of Frangelico which I was hesitant to do because of the hefty price tag. I figured that it would last forever like so many specialty liqueurs do. However, after perusing the Frangelico website and seeing a cocktail that was simply Frangelico, soda and lime my bottle is now half empty. It is delicious - make one now if you can.

But back to the honey...this is officially my new favorite homemade gift. Although simple, it's quite special. I drizzled it over some roasted pears for a quick dessert and imagine that it would shine on a cheese platter, perhaps alongside some pungent blue cheese.

For 1 cup:
  • 1 cup honey
  • 2 tablespoons Frangelico
  • 10-15 hazelnuts
In a small saucepan, combine the honey and the Frangelico over medium-low heat. When the honey is warmed through, turn up the heat until it just starts to boil, stirring constantly. Immediately remove from the heat and set aside for a few minutes to cool slightly.

Carefully pour the hot honey into a sealable glass jar. Set aside, uncovered, while toasting the hazelnuts.

Heat the oven to 350f (180c). Place the hazelnuts on a rimmed sheet and bake until just golden, about 5-7 minutes. Remove from the oven, place in the center of a kitchen towel, and rub together until their skins come off. Put the hazelnuts in the jar with the honey and seal. 

Thursday, February 10, 2011

Rich Red Pizza Sauce


I grew up eating thin crust sausage and mushroom pizzas at Fox Hole in McHenry, Illinois. I'd head to Lou Malnati's for a Chicago deep dish and had my first wood-fired pizza at a little Italian joint in London. My girlfriends and I would polish off a couple pizzas at Punch or Pizza Nea in Minneapolis on a regular basis. I love them all. 

What I don't love are the pizzas I've sampled in Australia. They are just...missing something. The crust isn't quite right or the cheese isn't cooked enough or the sauce is too subdued. The Aussies love their pizza because they're on offer everywhere we go, I'm just still searching for that great, perfect pie.

While I search, M and I have become near experts at making pizzas at home. I make the dough and the sauce, while M is in charge of shaping the dough, topping distribution, and cooking the pizza. He's come up with this addictive little trick where he brushes the crust of the pizza with honey before he bakes it---crispy, sticky, goodness. 

I have started making larger batches of sauce and freezing it in 1-cup portions. The sauce itself is loaded with flavor from the fresh herbs, garlic and imported Italian canned tomatoes. The red wine cooks down and adds depth to the other ingredients. It freezes beautifully and having it on hand is very useful, particularly if you've got some frozen dough at the ready too. 

For about 5 cups:
  • 4 tablespoons olive oil
  • 4 garlic cloves, chopped
  • 4-14 ounce (400 gram) cans diced Italian tomatoes (preferably San Marzano)
  • 1 can tomato paste
  • 1/2 cup fruity red wine
  • 1 teaspoon sugar
  • 1 teaspoon salt
  • 1/2 teaspoon crushed red pepper flakes
  • 1 tablespoon chopped fresh oregano
  • 1/4 cup chopped fresh basil
In a large saucepan, heat the olive oil over medium heat. Add the garlic and saute until just golden. Add the tomatoes, tomato paste, wine, sugar, salt and red pepper flakes. Stir together and bring to a simmer. 

Simmer, stirring occassionally until the sauce has thickened about 30-45 minutes. Stir in the oregano and basil. Taste and add more salt if needed. Remove from the heat and allow to cool slightly. Puree the sauce until smooth in batches in a blender, being careful to only fill it halfway so it doesn't erupt into a molten mess. 

Pour the sauce into plastic containers or ziploc freezer bags and freeze until ready to defrost and use.

Sunday, May 9, 2010

Rhubarb Marmalade

I had this idea to make a rhubarb marmalade the other day and promptly went out, bought some stalks of ruby red rhubarb, a couple Cara Cara oranges, a few lemons and set about canning for the first time in a long time.

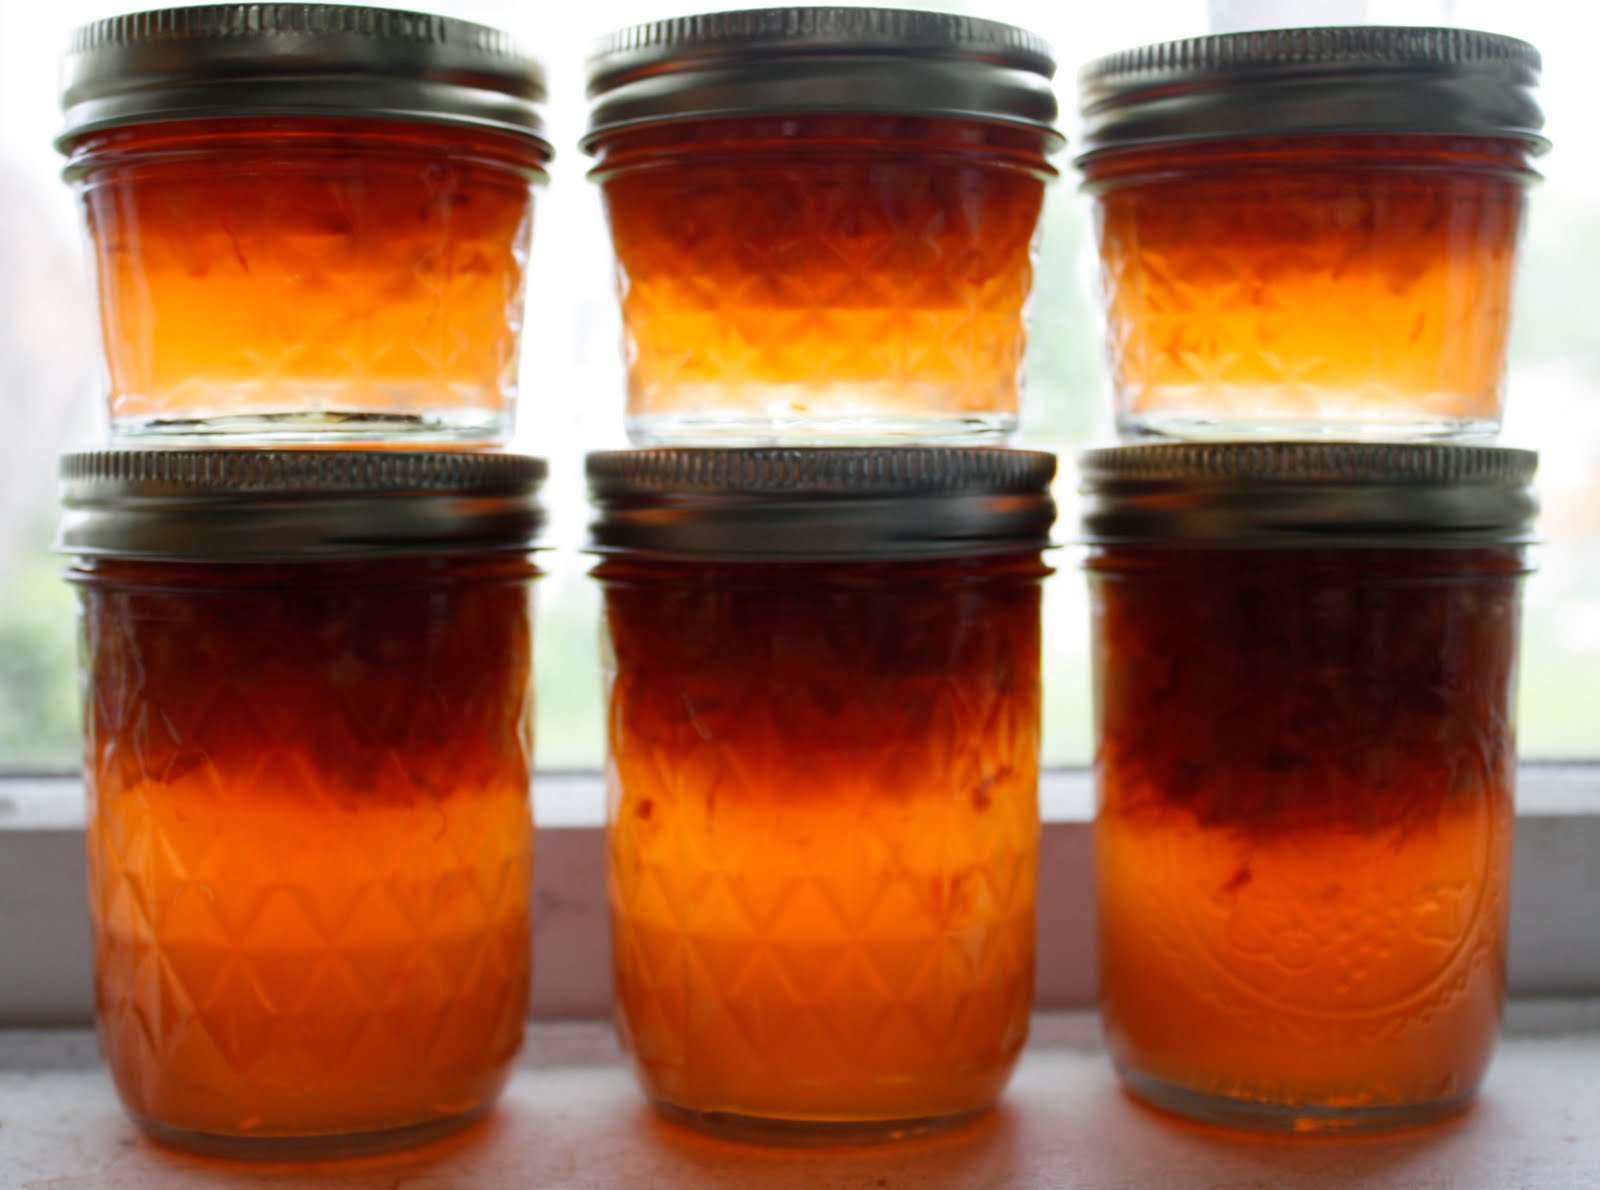
I have made marmalades three different times with mixed levels of disaster: Once, a clementine marmalade which never set up, despite my use of pectin. It was so liquidy that I marketed it to my friends as orangey goodness sauce. I made a grapefruit marmalade that was a bit better but saucy nonetheless. And now, this rhubarb marmalade that is decidedly un-saucy but for whatever reason separated in the jars so the rhubarb floated to the top and the jelly settled on the bottom.

I almost didn't post this out of canning shame but the way I see it, nothing is ever perfect, it tastes super good, and it actually looks kind of cool all layered and wrong in the jars. Oh well. I hand the jars to my devoted friends and say "just stir it, ok?"

For 8 half-pint jars:
  • 3½ cups finely chopped rhubarb
  • 3 oranges
  • 1 large lemon
  • ½ cup water
  • 1 tablespoon lemon juice
  • 7 cups sugar
  • ½ teaspoon unsalted butter
  • 1 packet liquid pectin

Wash the oranges and lemon well. Slice off the peels with a sharp paring knife avoiding the pith and then cut the peel into thin strips or use a citrus zester. Set the peels aside. Cut off the pithy part of the fruit, and then cut out each citrus segment. Set aside.

In a large, 8 quart pot, combine the peels, water, and rhubarb. Bring to a boil, lower the heat, cover and simmer for 15 minutes. Add the reserved citrus segments and sugar and stir constantly over medium heat until dissolved. Add the lemon juice and butter. Turn the heat to medium-high and stirring constantly, let the mixture come to a full, rolling boil. Quickly squeeze in the pectin, and stir briskly for one minute. Take the pot off the heat and set a timer for 5 minutes. Each minute, stir the mixture gently to distribute the fruit throughout the jelly.

Ladle the jam into the prepared, hot, sterilized jars and process in a water bath for 10 minutes. For detailed canning and sterilization procedures, click here.

Saturday, October 24, 2009

Caramelized Balsamic Red Onions

Sometimes I wonder if I need a separate refrigerator just to hold condiments. In fact, I have posted 18 condiment recipes on this blog alone. I find that if I have an arsenal of condiments on hand, I have a pretty easy time whipping up some good eats. And so, I made space in my fridge to hold a jar of these red onions which are pure sweet and savory goodness.

This recipe stems from my love of caramelized onions and the amazing depth that they add to so many dishes. They were the perfect compliment to a grilled lamb steak we had for dinner. I also imagine they would be fantastic spooned into a bowl of creamy squash soup or as part of a cheese plate. I may take a stab at making some puff pastry tarts with the onions and some gorgonzola.

Although it takes a while to make this, the level of effort is quite low. The onions benefit from the low, slow heat and turn amazingly sweet. Please don't use just any old balsamic in this. The vinegar needs to be smooth, without any harshness, to add that final layer of flavor to the jam.

For about 2 cups:

  • 3 large red onions, peeled, both ends trimmed
  • 3 tablespoons extra virgin olive oil
  • 4 tablespoons packed, light brown sugar
  • 3 sprigs fresh thyme
  • 2 teaspoons kosher salt
  • 1/8 teaspoon cayenne
  • 2 tablespoons good quality balsamic vinegar

Quarter the onions, cutting each quarter into 1/2-inch thick slices.

In a dutch oven over medium-high heat, add the olive oil. Add the onions and stir to coat with the oil. Cook, stirring frequently, for 15 minutes.

Turn the heat down to medium-low and add the brown sugar, thyme, salt and cayenne. Stir to coat the onions. Allow to cook, stirring occasionally for 1 hour.

Remove the thyme stems. Stir in the balsamic vinegar and turn the heat back up to medium-high. Cook, stirring frequently, for 10 minutes.

Allow to cool for 10 minutes. Pack the jam into sterilized, sealable jars, pressing down on the jam with a spoon to remove any air bubbles and store in the refrigerator for up to 10 days.

Friday, October 16, 2009

Spicy Calvados Applesauce

Applesauce is one of those things that is so simple to make at home that it should be scratched off your grocery list for good. It goes without saying that homemade sauce is far superior to store-bought, particularly because of the complexity created by using different apple varieties, spices and flavors.

As I detailed in my apple chips post, I find apples and five-spice powder to be a match made in heaven. It works as a mysterious, subtle spice in applesauce also but feel free to substitute cinnamon, nutmeg, etc.

I love the deluxe addition of the French apple brandy, Calvados. It imparts a richness without any overt alcohol flavor. Calvados is so good in so many things: pork dishes, whipped cream, brushed onto an apple tart, and so on. It's on the spendy side but I find that I use it sparingly so my bottle has lasted for quite a while.

If you don't want to go through the trouble of canning the applesauce, it can be portioned out into freezer bags or containers and frozen, for up to 6 months.

For about 5 pints:

  • 8 pounds apples (I used a combination of Haralson, Gala and Prairie Spy)
  • 1 cup water
  • 1 - 1½ cups sugar
  • 1 lemon
  • 1 teaspoon five-spice powder
  • Pinch of sea salt
  • 1/3 cup Calvados

Peel and cut the apples into 2-inch chunks and add them to a large pot. Zest and juice the lemon over the apples.

Over medium-high heat, add the water and one cup of the sugar to the pot with the apples. Stir frequently until the apples are soft, about 20 minutes. Turn the heat down to low and mash the apples with a potato masher until the desired consistency is reached. Stir in the five-spice powder, sea salt, and Calvados. Taste, and add up to a half cup more sugar depending on the desired level of sweetness. Stirring frequently to prevent scorching, raise the heat to medium-high and bring the sauce to a boil. Allow it to boil for one minute, stirring constantly, and then remove from the heat.

Have five sterilized pint canning jars ready. Fill the jars, leaving a 1/2-inch headspace. Run a plastic knife down the center of the jar and around the inside to remove any air bubbles. Process the jars in a lightly boiling water bath canner (about 200 degrees) for 20 minutes. Remove the jars from the water and set aside to cool for 24 hours before storing in a cool, dark location for up to a year.

For complete sterilization and canning procedures, click here.

Sunday, October 4, 2009

Cider Mustard

When I started this blog earlier this year, I did a post for Guinness Mustard that originated from Saveur Magazine. Not only was I enthusiastic about making my own mustard, but the friends I gave it to were asking for more which is always a clear indicator of success.

This version is a seasonal spin on the original recipe, incorporating Hard Cider (which I love this time of year), cider vinegar, a hint of honey and a little extra cinnamon to play up the apple undertones. A turkey, apple, and white cheddar sandwich spread with this mustard couldn't be more tasty.

Making mustard is a simple task and since I'm such a big proponent of all things homemade, I want to get in the habit of whipping up batches of it more often. It lasts for 6 months in the fridge and I store it in either 4-ounce or 8-ounce canning jars.
For about 31⁄2 cups:
  • 1 12-oz. bottle hard cider such as Woodchuck
  • 1 cup brown mustard seeds
  • 1⁄2 cup yellow mustard seeds
  • 1 cup apple cider vinegar
  • 1 tablespoon kosher salt
  • 1 teaspoon freshly ground black pepper
  • 2 teaspoons honey
  • 1⁄2 teaspoon ground cinnamon
  • 1⁄4 teaspoon ground cloves
  • 1⁄4 teaspoon ground nutmeg
  • 1⁄4 teaspoon ground allspice
Whisk together all the ingredients in a large glass bowl. Cover with plastic wrap and set aside at room temperature for a day or so.

Transfer the mixture to the bowl of a food processor and blend very thoroughly for several minutes, stopping to scrape the bowl a couple times as you blend. The mixture will thicken and emulsify.

Spoon the mustard into several clean jars and refrigerate.

Monday, September 7, 2009

Peach Ginger Conserve

Conserves, which are essentially jams containing dried fruits and nuts, have scared me for a long time. Believe me, I had clear reasons. One, I had never heard of such a thing until I started reading up on canning. Two, I had never had a conserve served to me nor had I ever seen it in a store. Three, I was apprehensive about the idea of nuts and raisins in my jam. My conserve-fear was irrational for it is a glorious thing.

Conserves were popular in old-timey days as a condiment for meat - which I am guessing means it served as a cover for questionable meat that had maybe not seen its freshest days. These days though, I serve it the same way as I would a jam and discovered it made a particularly good crepe filling. There's really no going wrong when peaches, ginger, brandy, raisins, almonds and a hint of orange are combined. So, so good.

For about 8 half-pint jars:
  • 1/2 cup golden raisins
  • 1/3 cup minced crystallized ginger
  • 1/2 cup brandy
  • 3 cups of pitted, peeled and crushed ripe peaches
  • 2 lemons, juiced
  • 6 cups sugar
  • The zest of 1 orange
  • 1/2 teaspoon unsalted butter
  • 2 pouches liquid pectin
  • 3/4 cup very lightly toasted sliced almonds

In a bowl combine the raisins, ginger and the 1/2 cup of brandy. Place in the microwave for 30-45 seconds and set aside while the rest of the ingredients are being prepped.

In an 8-quart pot stir together the peaches, lemon juice, sugar, orange zest, and butter. Drain the brandy off of the raisins and ginger and add them to the pot, reserving the brandy for later. Cook over low heat, stirring constantly until the sugar dissolves. Bring the heat up to medium-high and cook, stirring constantly to prevent scorching. When the mixture comes to a full boil, quickly squeeze both pouches of pectin into the pot and stir for 1 minute. Take the pot off the heat.

Set a timer for 5 minutes and stir in the almonds and a 1/3 cup of the reserved brandy. Stir the conserve once or twice every minute for 5 minutes to distribute the ingredients evenly through the syrup.

Ladle the jam into prepared, hot, sterilized jars and process in a water bath for 10 minutes at 200 degrees. For detailed canning and sterilization procedures, click here.

Adapted from a recipe in Blue Ribbon Preserves by Linda Amendt.

Friday, September 4, 2009

Mango Hot Sauce

Now that September is upon us, our peppers are in full force in the garden. We grow 6 different kinds but my particular favorite are the Wenk's Yellow Hots. Initially yellow, they transform to a coral and then bright shade of red. I usually end up picking them when they are a sort of mango color which inspired me to try my hand at making hot sauce.

I used a Rick Bayless recipe as a base and built my version around it, adding mango and a bit more sweetness in the form of agave nectar. Mr. Bayless' sauce uses habaneros which are of course, scorching, but the level of pepper heat is always a bit hard to describe, isn't it? I, for instance, would categorize Wenk's Yellow Hots as a sort of medium heat, similar to a jalapeno, but I am quite certain that my friend Eric would be weeping in a hellfire imprisonment if one even got near him. He thinks pepperjack cheese is spicy, so...yes. We are all different.

I loved this sauce and was motivated to make a tropical-style dinner to use up the sunshine-tinged goodness. I cooked up some black beans, white rice, and fried some nearly ripe plantains. The mango and tangy heat worked well together and made the whole meal deliciously spicy.

I have no evidence of this, but I am guessing that the amount of vinegar in the sauce will allow it to last quite a while in the refrigerator. I plan on packing mine into jars and handing them out to those who appreciate a little spice in their life.

For about 4 cups:

  • 6 cloves garlic, unpeeled
  • ½ pound fresh chili peppers, stemmed
  • 1 cup diced ripe mango
  • 1 medium carrot, peeled and roughly chopped
  • ½ a medium onion, roughly chopped
  • 1½ cups cider vinegar
  • 2 teaspoons kosher salt
  • 1 tablespoon agave nectar (or sugar or honey)

Roast the garlic cloves in a small skillet over medium-high heat, turning frequently until blackened in some spots and fragrant, about 10 minutes. Set aside and peel when cool enough to handle.

In a medium saucepan, combine the chili peppers, mango, carrot, onion, vinegar and 1 cup of water. Bring to a boil and simmer for 15-20 minutes.

In a food processor (or a blender), add the pepper mixture along with the salt, agave nectar and roasted garlic. Puree thoroughly until quite smooth. Taste and add a bit more salt or sweetener if desired.

Pour into jars and store, covered, in the refrigerator.

Adapted from a recipe by Rick Bayless

Tuesday, September 1, 2009

Heirloom Tomato, Corn and Squash Relish

One of the good things about being married to a chef is that I get to occasionally hang out with other chefs. This was the case a couple weeks ago when I volunteered at a local food and wine event. I helped man the Oceanaire table passing out Corn Cakes with Smoked Trout topped with an extremely tasty summer relish. At least a dozen people told me that the corn cakes were the best food item there...and, even though I am obviously biased, I had to agree.

A corn cake is a crowd-pleaser but for me, it was the relish element that made it a real standout. The flavors were so bright, so full of summer sun that I couldn't get enough of it. The Chef's boss, Rick, was kind enough to pass along his recipe to me which was adapted from one that appeared in Food and Wine magazine a while back.

I love the lively colors of this relish. Heirloom tomatoes come in so many shades that I recommend mixing them up if you have them. I used both lime green and deep purple tomatoes and they looked (and tasted) great. Last night we served this with some grilled steak but I can't think of a protein this relish wouldn't compliment. At the restaurant The Chef served it with some cornmeal crusted salmon and as an accompaniment to seared scallops with sweet corn flan.

For about 4 cups of relish:

  • ¼ cup rice wine vinegar
  • 2 tablespoons packed brown sugar
  • 1 teaspoon sea salt
  • ¼ cup olive oil
  • 1 clove garlic, minced
  • ½ teaspoon minced ginger
  • 1 teaspoons mustard seed
  • ¼ teaspoon freshly ground black pepper
  • ¼ teaspoon ground cumin
  • 2½ cups of ½-inch diced heirloom tomatoes
  • ¾ cup of ¼-inch diced zucchini or yellow squash
  • 1 ear of sweet corn
  • 2 tablespoons onion or shallot, minced
  • 1 jalapeno or other hot peppers, minced

In a small saucepan, boil the vinegar, salt and sugar until dissolved. Pour into a large bowl.

In a sauté pan, heat the oil over medium heat, add the garlic, ginger, mustard seeds, black pepper, and cumin. Stir frequently and remove from the heat after about a minute.

Slowly whisk the oil into the vinegar mixture. Blanch the sweet corn in boiling water for 1 minute. Run it under cold water or place it in an ice bath to cool. Cut the kernels off the cob and add it to the bowl. Add the tomatoes, squash, onion, and jalapeno and gently stir. Refrigerate for at least 4 hours or overnight.

Adapted from a recipe in Food and Wine Magazine.

Monday, August 24, 2009

Quick Cucumber Pickles with Tarragon

I have only recently begun making my own pickles from cucumbers in our garden and since I eat so many, I haven't bothered going through the trouble of actually canning them. These pickles last for about 3 weeks in the refrigerator but I would bet, if you're like me, they don't make it that long.

A mandoline is essential in getting perfect, thin slices of cucumber. I always look for reasons to use mine because as I slice away, I can't help but imagine one or several of my fingers getting shaved off which brings an exciting bit of drama to the whole process.

After the slicing adventure is over, all that's left to do is let the cucumbers soak in a bit of salt, boil the brine ingredients together, and combine it all in a couple of glass pint jars. A warning: the first time I made these I didn't rinse the salt off the cucumbers thoroughly enough and man, they were SALTy. Luckily I have good friends who ate them anyway.

For about 2 pints:
  • 1½ pounds cucumbers, ends trimmed (I use pickling cucumbers)
  • ¼ cup pickling salt
  • 1½ cups water
  • 1½ cups white vinegar
  • ¾ cup sugar
  • 1 tablespoon mustard seed
  • 2 bay leaves
  • ½ teaspoon celery seed
  • 6 peppercorns
  • 4 sprigs of tarragon

Thinly slice the cucumbers, place them in a colander and gently toss them with the salt. Cover the colander with plastic wrap and set it over a bowl. Let the cucumbers drain for one hour.

Meanwhile, bring the water, vinegar, sugar, mustard seed, bay leaves, celery seed and peppercorns to a boil in a saucepan. Allow to boil for 2-3 minutes, turn the heat off and transfer to a large measuring cup. Set aside to cool.

After the cucumbers are done draining, rinse them under cool water and gently toss them under the water to thoroughly remove the salt. Spread them out on several paper towels. Place more paper towels on top and press down to blot off the water. Sterilize 2 glass pint jars (I just run mine through the dishwasher). Divide the cucumbers between both jars. Nestle 2 sprigs of tarragon in each jar.

Most of the brine ingredients will have settled to the bottom of the measuring cup. This is fine. I just pour the brine into the jars and discard whatever brine ingredients remain. Once the cucumbers are covered with the brine, poke around the jars a bit with a knife to get rid of any air bubbles. Pour additional brine to cover, leaving ½-inch headspace. Screw the lids on and place in the refrigerator.

The pickles will be ready to eat in a day and are good for about 3 weeks.

Tuesday, July 21, 2009

Four Berry Jam

Us Minnesotans have been annoyed as of late that strange, Autumn-like weather descended upon us, bringing cold, cloudy gray days right smack in the middle of July. I knew that this cool weather provided optimal conditions for my least favorite hobby so, comforted by the knowledge that I wouldn't be sweating over pots of boiling jam and water, I set off to can the afternoon away.

I can't give the exact proportions of each type of berry used but can say that for this jam, you will need 5 cups of crushed fruit. What I ended up doing was crushing a single layer of each fruit (which is always how you should crush fruit for jams to ensure uniform texture) and then added it to a large measuring cup, repeating until 5 cups was reached. The end result was tasty indeed: dark burgundy in color with a rich berry flavor.

For 8 Half Pint Jars:
  • Strawberries, stemmed, cored, and quartered
  • Blackberries
  • Raspberries (I pushed half of the crushed raspberries through a sieve to take out some seeds)
  • Blueberries
  • 2 tablespoons fresh strained lemon juice
  • 1/2 teaspoon unsalted butter
  • 7 cups sugar
  • 1 package liquid pectin

In a large 8-quart pot, combine the 5 cups of crushed berries, lemon juice, butter and sugar over low heat. Start stirring the mixture, turning the heat up in small increments until all the sugar is dissolved, not bringing the heat up past medium. Turn the heat to medium-high and stirring constantly, let the mixture come to a full, rolling boil. Quickly squeeze in the pectin, and stir briskly for one minute. Take the pot off the heat and set a timer for 5 minutes. Each minute, stir the mixture gently to distribute the fruit throughout the jelly.

Ladle the jam into the prepared, hot, sterilized jars and process in a water bath for 10 minutes.

For detailed canning and sterilization procedures, click here.

Friday, June 26, 2009

Sorrel Butter

I''ve been too hot to cook so thankfully Guestblogger: The Chef came through for me. How can you go wrong with some extra-fancy herbed butter? I would imagine that any dinner guest would be impressed. -- A Crafty Lass

Compound (flavored) butter is used in almost every professional kitchen across the land, and yet absolutely ignored by home cooks. I’ve never quite understood why, considering how easy it is to whip up.

Remember when Jabba the Hut bronzed Han Solo? Same concept: flavorful bits like chives, Roquefort, or Harrison Ford circa 1983, are added to softened butter, chilled, and become suspended animation in your fridge until they are released by a sizzling steak, a steaming potato, or…Princess Leia?

One of our herb containers was downright bushy with sorrel, so I decided to give it a trim and lock the lemony leaves in a butter that would add zing to grilled chicken or salmon fillets, the latter combination being a rustic riff on the French classic, Salmon in Sorrel Sauce.

For at least 4-6 servings:
  • 1 stick unsalted butter ignored until room temperature
  • 3 tablespoons finely chopped sorrel leaves
  • 1 tablespoon finely chopped chives
  • 1 teaspoon freshly squeezed lemon juice
  • One pinch each of kosher salt and fresh ground black pepper

Combine all of the ingredients thoroughly, and chill until solid. It will keep, chilled, for 1-2 weeks or frozen for millennia.

Sunday, June 14, 2009

Mint Sugar

Besides being less minty, I wonder what my life was like before I discovered Mint Sugar.

Several years ago, when the Gourmet Cookbook came out, I wrote down a list of things I wanted to make out of it and a recipe for Fruit Salad with Mint Sugar caught my eye. The simplicity of it belies its greatness. What results from only two ingredients and a few spins in the food processor is a summery condiment, herbal and fragrant.

I keep a container of this in the fridge and find that its freshness particularly marry well with peaches, melon, and blackberries. And, in the case of a Mojito emergency, a few teaspoons of mint sugar replaces the traditional muddled mint quite nicely. If a pitcher of Mojitos would suit the occasion, then mint sugar is the surefire way to make cocktails for a crowd.

For about a cup:
  • 1 cup sugar
  • 1/2 cup of loosely packed fresh mint leaves

Place both ingredients in the bowl of a food processor and pulse until the mint is finely chopped and the sugar turns green. Use immediately or refrigerate. The mint sugar will last about a week in a sealed container in the fridge.

Saturday, May 30, 2009

Rhubarb Strawberry Jam

I had taken a much needed respite from canning but now that May is almost behind us, I need to start up my least favorite hobby again. I always am pleased when I have made something and have jewel-colored jars sitting in front of me. It's the lengthy, messy, exacting process of it all that gets me, not to mention that canning in the summer months with a vat of boiling water steaming up at me in my hot old house isn't even marginally pleasant.

Ah, but, there is the Minnesota State Fair to consider. Last year, I won a blue ribbon for my Rhubarb Raspberry Jam which was way too much fun. I am trying not to envision a ribbonless, sophomore slump season ahead of me which is why I continue to can and hope for the best.

Now, I am not going to attempt to provide detailed canning instructions since I found a great tutorial here. The recipe below is for the amounts and general method I used, but proper waterbath canning and sterilization procedures must be followed.

I have never made this particular flavor jam before and am happy to say it is delicious. The color is exceptionally exquisite and the flavor is fresh and very fruity.

For about 7 half pint jars:
  • 2½ cups of finely diced rhubarb (the pieces should be about the size of a pencil eraser)
  • 2 cups of chopped and crushed strawberries
  • The strained juice of one small lemon
  • 6½ cups sugar
  • 1/2 teaspoon unsalted butter
  • 1 pouch Certo Liquid Pectin (3 ounces)

In a big heavy 8-quart pot, combine the rhubarb, strawberries, lemon juice and sugar. Stir together, cover and set aside for 2-3 hours, giving it a stir once or twice.

Remove the cover and over low heat, start stirring the mixture, turning the heat up in small increments until all the sugar is dissolved. If the mixture is heated too quickly, the sugar can crystallize in the jar later. It took about 40 minutes for my mixture to fully dissolve. At this point, stir in the butter, which helps prevent air bubbles, turn the heat to almost high and stir constantly. Once the mixture comes to a full, rolling boil, quickly squeeze in the pectin, and stir for one minute. Take the pot off the heat and set a timer for 5 minutes. Each minute, stir the mixture gently to distribute the fruit throughout the jelly.

Ladle the jam into the prepared, hot, sterilized jars and process in a water bath for 10 minutes.

Friday, February 6, 2009

Fresh Ricotta


It’s an honor to be guest Lad, so thanks to Erin for inviting me. I thought this would be an appropriate posting since it reminded me that many things are easily made at home—and they’re better, too!

I’m friends with Sally Swift, who produces the radio show “The Splendid Table” with Lynne Rossetto Kasper. This past weekend I ran into Sally at a dinner party and we were talking cooking. I proudly told her that I had starting making my own ravioli, but pride turned to shame when she discovered I purchased ricotta cheese for the filling. “Oh, but Eric, it’s SO easy to make yourself!” My cheeks flushed and I vowed to learn more about it.

The next day I opened up “The Splendid Table” cookbook and turned to page 454. Sally was absolutely right; it’s a snap. First, heat up some milk, cream and lemon juice to 170 degrees over low heat, not stirring more than 3-4 times. This must be done slowly—mine took 45 minutes to come to that temperature. Once you reach 170, increase the heat to medium and bring it to 208 degrees without stirring. Then turn off the heat and let it sit. After 10 minutes, pour it into a damp, double thickness cheesecloth-lined colander set over a bowl, and if you’re like me, a light bulb will go off over your head as you finally understand why it’s called “cheesecloth.” Let it drain for 15 minutes, add our friend, salt, and you’re all set! You’ve got smooth and creamy ricotta cheese that you’ll want to eat by the handful.

A couple of things to note about making ricotta: non-reactive pans and utensils must be used. And pasteurized cream is recommended, which is a little harder to find than ultrapasteurized; I found Cedar Summit Farms cream worked perfectly.

For a pound of ricotta cheese:
  • 2½ quarts whole milk
  • ¾ cup less 1 tablespoon heavy cream, pasteurized but not ultrapasteurized or sterilized
  • 5 tablespoons plus 1 teaspoon fresh lemon juice
  • 1/8 teaspoon salt (optional)

Follow the directions above, and, when finished, turn the cheese into a covered storage container, add salt if desired, and refrigerate the ricotta until needed. The finished cheese keeps 4 days in the refrigerator.

Tuesday, February 3, 2009

Crème Fraîche


I discovered crème fraîche while enjoying a proper high tea at the Drake Hotel in Chicago when I was a child. I was initially perplexed at why everyone was putting a dollop of sour cream on their scones and, not wanting to appear uncouth, I put a smidge on mine next to the strawberry preserves. Crème fraîche and I fell in love.

Crème fraîche, French for “fresh cream” has the subtle nuttiness and luxurious texture which reminds me of my adoration of all things dairy. For years I have bought it at the store for a treat to serve with pancakes, scones, as a topping for various fruits, and in savory, creamy dishes too. For ultimate comfort, I have been known to take a piece of crusty baguette, spread it with crème fraiche and drizzle it with orange blossom honey.

I knew that it could be made at home but didn’t attempt it until this weekend. After such minimal effort, I just feel foolish for buying it all these years.

For a cup of crème fraîche, combine 1 cup heavy whipping cream and 2 tablespoons of buttermilk in a glass bowl and cover it with plastic wrap. I figured it would do better with some warmth so I just set the bowl on the radiator in my kitchen and looked at it every now and then. After 24 hours, it was quite thick, and once refrigerated, it thickened even more. Voila!

Here are some recipes that use crème fraîche in all its creamy, French glory:

Cherry Lime Cobbler with Crème Fraîche Biscuits from Bon Appetit

Crème Fraîche Ice Cream from Gourmet

Mussels in White Wine and Crème Fraîche from The New York Times

Roasted Figs with Vanilla Crème Fraîche from Williams Sonoma

Coddled Eggs with Wild Mushrooms and Crème Fraîche from Martha Stewart

Sunday, February 1, 2009

Grapefruit Orange Curd

This began as a disaster. I was all excited to whip up a curd, saw all the beautiful citrus at the grocery store and decided to do a grapefruit orange combination. I also wanted to make a real curd which is juice, sugar, eggs, egg yolks and butter without any additional stabilizers like cornstarch or gelatin. Things began well. The citrus made a lovely color juice, the other ingredients added incredible richness, but I made the mistake of keeping to close to the recipe and not trusting my instincts.

The ingredients for a curd are to be combined in a heat-proof bowl and whisked over a pan of boiling water until it reaches a temperature of 170 degrees. If it reaches 180, the eggs scramble. Feeling this was an exact science, I ignored that my curd was runny, that it didn't seem properly curd-like, and instead stared obsessively at my thermometer. My delusions continued when I decided that it would "become" curd once it was fully chilled. Um, no. It was liquid, and what was worse, it was separating in the jar.

The Chef got home later that night and I was in full curd despair. He proclaimed I was acting insufferably, and reminded me that there are many factors to consider when making any sauce, whether it be hollandaise, beurre blanc, etc. For instance, my thermometer could be off a bit.

The next day I poured the curd back into my heat-proof bowl, stirred it over the boiling water and gave it the time it needed, resulting in a rich, satiny sauce with subtle citrus tang and a gorgeous color. I let it reach 180 on my thermometer before it seemed the right consistency, so since I didn't end up with a scrambled sauce, my thermometer is clearly a bit off.

There are many, delicious things to do with this traditionally British sauce. Serve it with scones, biscuits or toast. Fold it into whipped cream. Use as a filling for cakes or tarts. Or, eat it with a spoon like I have been trying not to do all day.

My curd consisted of:

  • 1/2 cup strained fresh orange juice
  • 1/2 cup strained fresh grapefruit juice
  • 1 2/3 cup sugar
  • 4 eggs
  • 7 egg yolks
  • 10 tablesoons unsalted butter
Below is a link to a very informative page from Williams Sonoma with detailed curd making instructions. The curd will keep, in the refrigerator, for 2 weeks to a month.

For instructions on making fruit curds, click here.

Monday, January 12, 2009

Spicy Guinness Mustard

As most everyone knows, Guinness is one of the 5 major food groups and should be incorporated into one’s diet as often as possible. How delightful, then, that a recipe for Guinness mustard appeared in the January issue of Saveur. When I saw the recipe and photo in all of its pungent, chocolaty glory I wanted to go frolic through a field of shamrocks on a misty day...or, at the very least, eat a corned beef sandwich with said mustard.

I’ve never considered making my own mustard before, especially since there is such good mustard out there, like Maille. But, in most cases, making homemade anything is truly satisfying and allows for impromptu gifts that the recipients will be undoubtedly appreciative of.

What I discovered in undertaking this feat is that making mustard is quite simple. All it requires is a bottle of Guinness Extra Stout (the stout adds a necessary robustness), mustard seeds, red wine vinegar, salt and spices. It took no more than 5 minutes to mix it all together and set it aside for a day or two. Then, you just give it a thorough, three minute whirl in a food processor where it becomes mustard right before your eyes. Spoon it into some jars and keep it in the fridge for up to six months.

For the recipe, click here.

Thursday, January 8, 2009

Preserved Meyer Lemons

In the past few years I have been quite taken with Meyer Lemons. Originating from China, and thought to be a cross between a lemon and a mandarin orange, these thin-skinned, mildly acidic fruits are pure loveliness and make a great stand-in for regular old lemons. I decided to preserve them, Moroccan style, and look forward to using them in the months to come.

Preserving lemons is easy, and the gently perfumed end result is well worth the minor effort. All that's needed is lemons, some pint canning jars, kosher salt, olive oil and patience. If you want to add an additional layer of flavor, cloves, cardamom pods, or cinnamon sticks can be packed in the jars along with the lemons.


  • 2 pounds Meyer Lemons (about 5-7)

  • ½ cup of kosher salt

  • Olive oil

Cut all but one of the lemons into eight wedges and get rid of any seeds. Combine the wedges and the salt in a bowl and toss well to coat. Pack into 2 pint jars, tightly, pressing on them as you pack to extract the juices. Squeeze the juice from the remaining lemon and pour over the jars evenly.

Set jars aside for one week at room temperature, shaking gently once a day. After the week is up, pour olive oil onto any remaining space at the top of the jars and refrigerate. The lemons will keep 6 months to a year in the fridge.

Below are some links to some fantastic sounding recipes using Preserved Lemons:

Roast Chicken with Preserved Lemons from The New York Times

Braised Lamb Shank with Preserved Lemons from The New York Times

Israeli Couscous with Roasted Butternut Squash & Preserved Lemon from Gourmet Magazine

Preserved Lemon and Olive Mayonnaise from Bon Appetit

Italian Tuna and Shaved Fennel Sandwich with Black Olive Paste from Epicurious

Buffalo Mozzarella with Preserved Lemon and Crispy Basil Leaves from Donna Hay